Visit us at the Bobcaygeon Makers Market April 25, 2026

Signs & Designs that Work for You
Formerly Graphix by Design
Graphic Design and Set up fees
Why Design Is Charged Separately
Printing is the final production step — but design is what makes the file ready for production.
By separating design from printing, you ensure:
-
Accurate pricing based on the work required
-
Flexibility for simple vs complex jobs
-
Better overall results
In Simple Terms
Graphic design charges reflect the time, tools, and expertise required to turn your file into something that prints correctly and looks professional.
Graphic Design $55/hour. Flat rates available for not for profits
What fees are based on
The biggest factor in design cost is time.
This can include:
-
Setting up files to correct sizes and proportions
-
Adjusting layouts for print or signage
-
Fixing low-resolution or unusable images
-
Rebuilding or recreating artwork
-
Preparing files for production (prepress)
Even small jobs can require careful adjustments behind the scenes.
Example:
A “quick” flyer update might involve resizing, reformatting for bleed, correcting images, and exporting properly — all of which take time to do correctly.
From Screen to Print: Why Your File Needs Preparation
What looks perfect on your screen doesn’t always translate the same way in print. Differences in size, resolution, color, and layout mean that most files require some level of preparation before they’re ready for production. Here’s a simple breakdown of what goes on behind the scenes — and why it matters.
Graphic Design for Print: What Goes Into Making Files Print-Ready
Before anything goes to print, there’s an important step that ensures everything looks exactly as it should — file preparation. This process involves adjusting layout, resolution, color, and structure so your final product is sharp, aligned, and professionally finished. Below is a quick overview of what that involves and why it’s necessary.
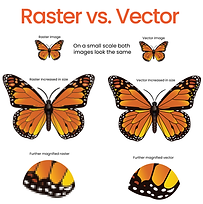
1. Screens vs Print: Pixels vs Physical Size
On a screen, everything is made of pixels — tiny squares of color that scale
easily across devices.
In print, however, size is physical — measured in inches or millimeters —
and resolution becomes critical.
-
A logo that looks sharp on your phone may not scale cleanly to a
24" x 36" poster
-
A photo pulled from social media may look fine online but print blurry
on a flyer or brochure
For print, files typically need to be 300 DPI at full size to maintain clarity.
2. Why Margins Exist (and Why They Matter)
That “extra edge” (often 0.125" or 1/8 inch) is part of standard print setup called:
Bleed and Safe Area
These apply across many products:
-
Business cards & flyers: prevent thin white edges
-
Posters & signs: ensure full-color backgrounds print edge-to-edge
-
Stickers & labels: avoid uneven trimming
Key elements:
-
Bleed: Artwork extends past the trim edge
-
Trim line: Final cut size
-
Safe margin: Keeps text/logos from being cut off
Without these, you can end up with:
-
White borders on full-bleed designs
-
Text cut too close to edges
-
Designs that feel slightly “off” after trimming
3. Why Files Often Need Adjustment
Most files provided by clients are created for screen use, not print production.
Common issues include:
-
No bleed included
-
Incorrect file size or proportions
-
Low-resolution images
-
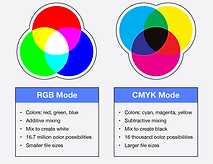
Colors set for screen (RGB) instead of print (CMYK)
-
Text or logos placed too close to edges
So before printing, files often require:
-
Extending backgrounds or artwork
-
Rebuilding layouts to proper dimensions
-
Adjusting colors for accurate print output
-
Enhancing or replacing low-resolution images
This process is called prepress — it ensures your design translates properly from screen to physical product.
4. Layout & Structure: More Than Just “What You See”
For many printed items, what you see in a file isn’t exactly how it prints.
Examples:
-
Booklets & magazines:
Pages must be arranged in specific sequences for folding and binding (multiples of 4) -
Brochures (tri-fold, bi-fold):
Panels need to be sized and spaced correctly so they fold evenly -
Large signs & banners:
Files must be scaled properly while maintaining resolution -
Multi-page documents:
Covers, inside pages, and spacing all need to be structured correctly
This means files often need to be reorganized behind the scenes to ensure everything lines up properly after printing, cutting, and folding.
5. The Goal: Predictable, Professional Results
All of these adjustments exist for one reason:
To make sure what you receive in print looks clean, sharp, and exactly as expected.
Without proper setup, even a well-designed file can result in:
-
Blurry or pixelated images
-
Crooked or uneven borders
-
Misaligned folds or panels
-
Important content being trimmed off
6. What Graphic Design & Prepress Actually Cover
Graphic design in a print environment often includes:
-
Preparing files for correct sizing and layout
-
Adjusting or rebuilding artwork for bleed and trim
-
Image correction and resolution adjustments
-
Color conversion for accurate printing
-
Structuring files for folding, binding, or installation
-
Ensuring consistency across multiple pieces
In many cases, this work happens after a design is “finished” — to make it truly print-ready.
Final Thoughts: Why Design & Printing Are Separate
Printing is the production step — but getting a file ready for print requires technical setup and attention to detail.
By separating design/prepress from printing, you ensure:
-
Better quality results
-
Fewer errors or reprints
-
A smoother production process
Because every file is different, the amount of preparation required can vary — which is why setup is quoted based on the work involved.